Mastering 3D Lighting and Composition: Practical Workflows with Blender and Nuke
- Jul 9, 2025
- 12 min read

When you think about truly memorable 3D art, what comes to mind first? It’s often the striking 3D Lighting and carefully planned 3D Composition that make the difference between something ordinary and something extraordinary. These elements don’t just make your scene look better—they tell a story, guide the viewer’s eye, and set the mood.
QUICK LINKS :
If you’re an artist working in Blender and Nuke, you already know how essential it is to master 3D Workflow practices. These two powerhouse tools form the backbone of many professional pipelines—Blender for modeling, animation, and Lighting Techniques, and Nuke for industry-standard Compositing.
At Whizzy Studios, we’ve seen firsthand how powerful the combination of Blender and Nuke can be for producing polished, professional-quality work. Whether you're aiming to improve your Render Passes, develop cinematic Color Grading, or perfect your Look Development, understanding these tools is crucial.
Think of it like this: 3D Lighting sets the stage, creating mood with techniques like HDRI Lighting, Three-point Lighting, and Volumetric Lighting. Meanwhile, 3D Composition ensures every element in your scene supports the story you want to tell, using framing, balance, and depth.
And when it’s time to finish your scene? That’s where Compositing in Nuke shines. From Node-based Compositing to integrating Render Layers, Relighting, adding Depth of Field and Motion Blur, Nuke gives you precise, flexible control.
If you're serious about growing as an artist or want to level up your portfolio, these skills aren't optional—they're essential. And if you’re looking to collaborate on your next project, you can always hire dedicated Artist to bring these workflows to life with you.
Foundations of 3D Lighting and 3D Composition
If you want to master 3D Workflow, you need to get comfortable with the foundations. Let's start with 3D Lighting—it’s so much more than just turning on a lamp in your scene. It’s about Lighting Techniques that shape mood, focus, and storytelling.
Core Lighting Types and Setups

Key Light: This is your main light source. It defines your subject’s form and is critical in every 3D Lighting setup. In Blender, you can use area lights, spotlights, or even HDRI Lighting to achieve realistic effects.
Fill Light: This light softens the shadows created by the Key Light. It adds nuance and depth without flattening the image, a key part of any 3D Workflow.
Rim Light: Also called backlight, it helps separate your subject from the background. In Blender, try combining Volumetric Lighting for atmospheric rim effects.
Ambient Light: This is the subtle, overall light in a scene. Use it sparingly to avoid washing out detail, but it’s essential for balancing your Three-point Lighting setups.
At Whizzy Studios, we use these Lighting Techniques extensively to ensure every render pops with depth and realism. It’s this attention to 3D Lighting detail that makes the work stand out.
3D Composition Principles
Great 3D Composition is what turns a well-lit scene into a compelling image. Let’s look at some essentials:
Rule of Thirds: Divide your frame into thirds horizontally and vertically. Place key elements along these lines or intersections to create balance and focus. It’s classic for a reason.
Framing: Use objects in the scene to guide the viewer’s eye toward the subject. Think of doorways, windows, or even light cones from Volumetric Lighting in Blender to naturally frame your subject.
Balance: Avoid crowding one side of the frame. Balance can be symmetrical or asymmetrical, but always deliberate. Good 3D Composition feels intentional and pleasing.
By mastering these 3D Lighting and 3D Composition foundations, you're setting yourself up for advanced workflows in Blender and Nuke. And when you're ready to go even further, you can always hire dedicated Artist to bring professional expertise to your project.
Lighting Workflows in Blender
Now that we’ve covered the foundations of 3D Lighting and 3D Composition, let’s get hands-on with how to actually build these setups in Blender. This is where your 3D Workflow truly comes alive.
At Whizzy Studios, we believe Blender is an incredible playground for artists to experiment with Lighting Techniques. Let’s break down a few essential approaches you can start using today.
Environment Lighting and HDRIs

One of the fastest ways to add realistic 3D Lighting is through HDRI Lighting. These high-dynamic-range images wrap your scene in real-world light data.
In Blender, just pop an HDRI into the world shader. Suddenly you have rich, nuanced lighting and reflections that elevate your 3D Composition instantly. It’s perfect for exterior scenes or creating subtle, believable indoor moods.
If you’re serious about a professional 3D Workflow, you’ll want to build an HDRI library. We do this constantly at Whizzy Studios to ensure every project has access to versatile lighting setups.
Three-point Lighting Techniques
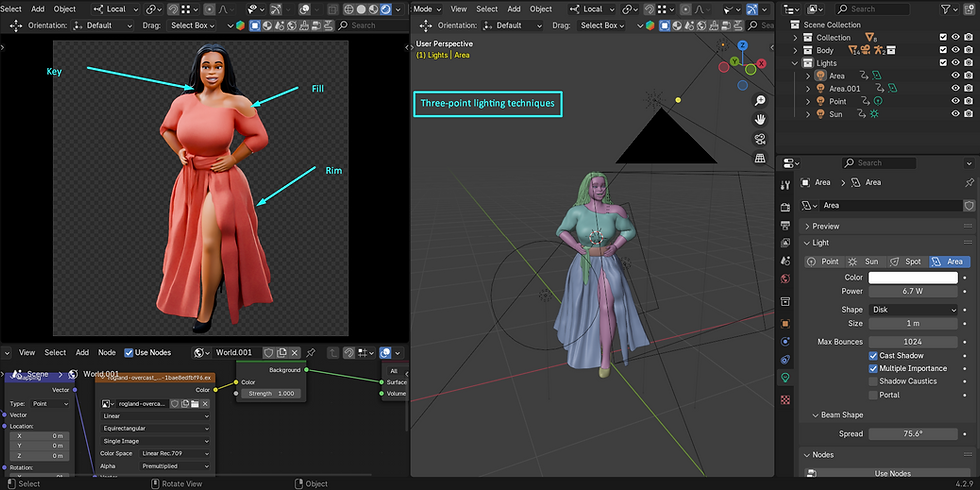
While HDRI Lighting is great, sometimes you want full control. That’s where classic Three-point Lighting shines:
Key Light: Your primary, most intense light, defining form.
Fill Light: Softer, reducing shadows without killing contrast.
Rim Light: Adds that professional polish by separating your subject from the background.
In Blender, you can use area lights, spotlights, or even emissive planes for these roles. This flexibility is why Blender is a favorite in many professional pipelines.
Advanced Features: Volumetrics and Emissive Materials
Want mood? Add Volumetric Lighting. Fog and atmosphere give your 3D Composition cinematic depth. In Blender, use the volume scatter node or world volume shader to add haze and light shafts.
For dramatic or sci-fi scenes, Emissive Materials are a must. They act as both object and light source, giving your scene a stylized glow that can’t be matched with traditional lamps alone.
When you’re refining these details, don’t forget the next step: preparing your scene for Compositing. Whether you’re using Blender’s own compositor or moving to Nuke, you’ll need to plan Render Passes, Render Layers, and Color Grading to finish strong.
And if you want expert help setting up advanced Lighting Techniques in Blender, you can always hire dedicated Artist to bring that polished look to your project.
Render Passes and Exporting from Blender
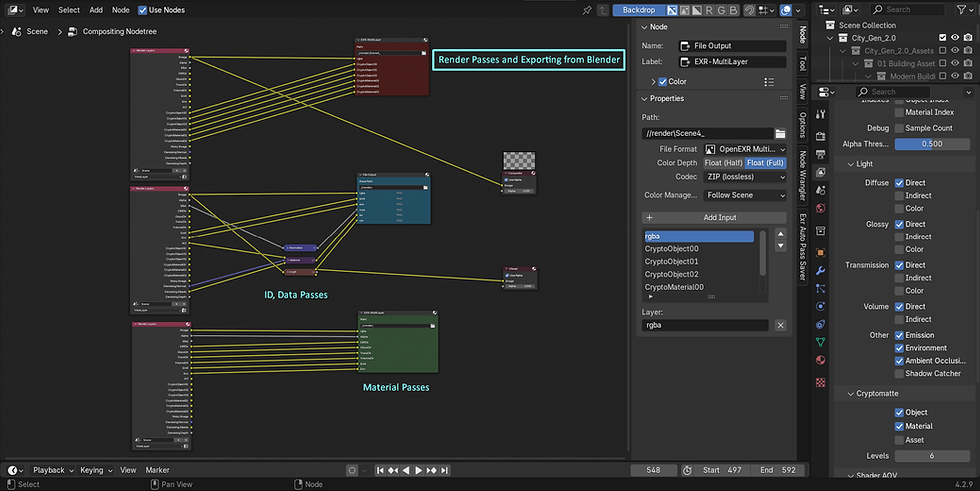
Alright—your scene is beautifully lit with professional 3D Lighting and designed with thoughtful 3D Composition. But to make your 3D Workflow truly professional, you need to plan for Compositing. That means getting your scene out of Blender in the right way—complete with detailed Render Passes and well-prepared files.
At Whizzy Studios, this is where projects go from good to jaw-dropping. Let’s break it down step by step.
Render Layers and Key Render Passes
Render Layers let you organize your scene into logical chunks—background, foreground, effects elements. This gives you control over individual pieces in Nuke or Blender’s own Node-based Compositing environment.
But the real power is in Render Passes. These are the individual lighting and material components that you can adjust in post:
Diffuse: Base color without reflections—essential for basic shading tweaks.
Specular: The shiny highlights—lets you fine-tune gloss and sparkle.
Shadow: Gives control over darkness and contact shadows.
Emission: Perfect for Emissive Materials—those glowing elements you worked so hard on.
Z-depth: For adding Depth of Field and atmospheric perspective in Compositing.
Normal: Useful for Relighting in Nuke.
By splitting your scene into these Render Passes, you’re not baking in decisions permanently. It’s 3D Workflow flexibility at its finest.
Preparing Multi-pass EXR Files for Compositing
Once your Render Passes are ready, export them in a single, multi-layer EXR file. EXR is the industry standard for high-dynamic-range images and preserves all that beautiful data.
Blender makes this easy: just enable “Multilayer EXR” in the output settings.
At Whizzy Studios, we always use EXR for professional Compositing because it allows for non-destructive adjustments in Nuke—you can tweak light intensity, color, even fake Motion Blur without re-rendering.
If you want expert help setting up a perfect export pipeline, you can always hire dedicated Artist who knows these 3D Workflow tricks inside out.
Best Practices for Color Management
Finally, don’t skip Color Management! Blender’s Filmic view transform helps keep highlights from blowing out and gives renders that cinematic contrast you want for Color Grading later.
Always work in linear color space internally for accuracy.
Use Filmic for preview and export.
Don’t bake in excessive contrast—save it for Look Development in Nuke.
Proper Color Grading and Look Development can turn a flat render into a polished, cinematic shot that clients (and audiences) love.
By taking the time to export your Render Passes correctly, you’re setting yourself up for a professional-level 3D Workflow in Nuke. And that’s exactly where we’re headed next: into the power of Compositing.
Introduction to Compositing in Nuke

You’ve lit your scene with beautiful 3D Lighting, planned perfect 3D Composition, and exported your Render Passes from Blender. Now it’s time to finish the job in Nuke, one of the industry’s most powerful tools for Compositing.
At Whizzy Studios, this is the stage where everything comes together. Let’s talk about why Compositing is so essential in a professional 3D Workflow—and how Nuke can make it not just easy, but incredibly flexible.
Why Compositing is Essential
Ever felt like your raw renders look “flat” even with great Lighting Techniques and thoughtful 3D Composition? That’s because no render is truly finished straight out of Blender.
Compositing lets you:
Adjust Lighting Techniques without re-rendering (thanks to Render Passes).
Fine-tune color, exposure, and contrast with Color Grading.
Add realistic Depth of Field, Motion Blur, and subtle Visual Effects.
Combine multiple Render Layers seamlessly.
Integrate 3D Art with live-action footage for a professional finish.
It’s a vital step in any 3D Workflow that wants to match industry standards.
Nuke’s Node-based Workflow Overview
Nuke is legendary for its Node-based Compositing. Unlike layer-based systems, nodes make your workflow non-destructive, clear, and incredibly flexible.
Each node performs one job—like adjusting color, applying blur, or combining Render Passes.
You can branch, rearrange, or tweak nodes without breaking your entire comp.
It’s perfect for working with EXR files from Blender, because you can split out your Diffuse, Specular, Shadow, and other passes for precise control.
At Whizzy Studios, our artists love Nuke for its clarity. You always know exactly what’s happening at every stage in your 3D Workflow.
Setting Up a Basic Comp for 3D Renders
Here’s a simple roadmap to get started:
Import your multi-pass EXR file.
Shuffle out individual Render Passes like Diffuse, Specular, Shadow, Emission (for Emissive Materials), and Z-depth.
Merge these passes to recreate your beauty render—but with full control.
Add Relighting nodes to tweak lighting direction or intensity without re-rendering.
Apply Depth of Field using your Z-depth pass for cinematic 3D Composition.
Finish with Color Grading for that final polish.
And don’t worry—if this feels like a lot, you can always hire dedicated Artist with experience in Blender and Nuke to help set up your comp or even train your team.
Advanced Nuke Workflows for 3D Artists
So you’ve got the basics of Compositing in Nuke down? Great—let’s level up. This section is all about pushing your 3D Workflow further, using advanced Nuke features that give you incredible control over your 3D Lighting, 3D Composition, and the final look of your 3D Art.
At Whizzy Studios, these Advanced Nuke Workflows are the difference between a student project and professional, client-ready work.
Using Render Passes for Fine Control
Remember all those Render Passes you exported from Blender? Diffuse, Specular, Shadow, Emission, Z-depth—this is where they shine.
In Nuke’s Node-based Compositing:
Adjust the Diffuse pass to tweak base colors without touching reflections.
Modify Specular highlights for subtle polish.
Control Shadow density to match the mood of your scene.
Enhance Emission for glowing Emissive Materials.
This level of control means you don’t need to go back into Blender every time you want to change something small. It’s efficient, non-destructive, and essential for a professional 3D Workflow.
If this sounds complicated, don’t worry—you can always hire dedicated Artist to help set up a bulletproof node tree in Nuke.
Relighting, Depth of Field, and Motion Blur
One of Nuke’s most powerful features is Relighting. Using Normal and Z-depth passes from Blender, you can:
Change light direction after rendering.
Add or remove highlights.
Match lighting to live-action plates seamlessly.
This is a game-changer in 3D Lighting and 3D Composition.
Similarly, Depth of Field is easy to add in post using your Z-depth pass. No need for long render times in Blender—you get cinematic focus pulls with a simple node.
And don’t forget Motion Blur. Rather than baking it in (which increases render times), you can use Nuke’s vector blur tools to add realistic motion blur during Compositing. This keeps your renders fast and your 3D Workflow flexible.
Integrating 3D Renders with Live-Action Footage
For many projects, you’re not just delivering standalone 3D Art—you’re combining it with live-action plates. Nuke is designed for this:
Use Camera Tracking and Matchmoving nodes to align your 3D Composition perfectly with filmed footage.
Apply Color Grading to match your render’s look to the scene’s lighting.
Add subtle Visual Effects like Volumetric Lighting or lens flares to blend elements seamlessly.
At Whizzy Studios, we use these techniques every day to deliver polished, professional composites that clients love.
Mastering Advanced Nuke Workflows is essential for any serious 3D Artist. It’s the final polish that makes your work look like it belongs in film, TV, or high-end marketing.
And if you want a partner to help you get there? Don’t forget you can hire dedicated Artist who knows Blender, Nuke, and every trick of the trade.
Look Development and Final Touches
Alright, you’ve made it this far—your 3D Lighting is on point, your 3D Composition is compelling, your Render Passes are exported from Blender, and your Compositing in Nuke is solid. But wait—it’s not finished yet!
The Look Development stage is where you give your project that polished, cinematic finish that truly sells your 3D Art. This is where you ensure your 3D Workflow ends with a bang, not a whimper.
At Whizzy Studios, we see Look Development as the fun part. Let’s talk about how to get there.
Color Grading and Exposure Balancing
Color Grading isn’t just about making things pretty—it’s about storytelling. Want your scene to feel warm and welcoming? Cool and sterile? Dark and moody?
Using Nuke’s Node-based Compositing, you can:
Balance your exposure so highlights don’t blow out.
Match elements from different Render Layers for consistency.
Push color to create mood and unify your 3D Composition.
If you exported in linear color space from Blender, you’ll have all the dynamic range you need for subtle, professional Color Grading.
This step is a big part of any professional pipeline, ensuring your 3D Art looks like it belongs on a movie screen.
Adding Visual Effects like Glows and Flares
Once your base Color Grading is locked, it’s time to add finishing touches that make your work feel alive:
Subtle glows on Emissive Materials enhance Lighting Techniques without looking cheesy.
Lens flares can be added tastefully to sell Volumetric Lighting or bright light sources.
Atmospheric elements like haze, dust, or even fake Motion Blur add depth and realism.
Nuke excels here. Because it’s node-based, you can dial these effects in carefully, ensuring they support your 3D Composition rather than overwhelm it.
And if you're ever feeling stuck? Remember you can hire dedicated Artist to help add that extra layer of realism and polish.
Using LUTs and Achieving Cinematic Looks
Finally, let’s talk about LUTs (Look-Up Tables). These are pre-defined color transformations that instantly give your render a specific mood or filmic style.
Want a Hollywood teal-and-orange look? Easy.
Need that bleached sci-fi vibe? Also easy.
Combine multiple LUTs for custom grading pipelines.
In Nuke, you can use LUTs non-destructively, testing out different looks without permanently baking them in. This flexibility is why it’s the standard for high-end 3D Workflow.
Using LUTs thoughtfully is what turns your 3D Art from “good” to “wow.” It’s the last step in perfecting your Lighting Techniques, enhancing your 3D Composition, and making sure every pixel supports your vision.
At Whizzy Studios, we treat Look Development as the final, crucial storytelling stage—because that’s what viewers will remember.
Conclusion
Congratulations—you’ve just taken a deep dive into creating truly professional 3D Art using Blender and Nuke. Let’s do a quick recap of everything we covered, so you can see how all these pieces fit together into a seamless 3D Workflow.
First, we explored the foundations of 3D Lighting and 3D Composition. You learned why Lighting Techniques like Three-point Lighting, HDRI Lighting, and Volumetric Lighting matter so much. Good lighting doesn’t just illuminate your scene—it tells a story, creates mood, and guides the viewer’s eye.
Then we dove into Blender itself. We discussed Lighting Workflows in Blender, mastering Emissive Materials, setting up your scene with careful Render Layers, and exporting perfect Render Passes in EXR format. These steps ensure you have total control when you move on to Compositing.
From there, we tackled Nuke, the industry-standard for Node-based Compositing. You saw how importing Render Passes from Blender lets you tweak Diffuse, Specular, Shadow, and Emission layers with precision. We covered Relighting, adding Depth of Field, and Motion Blur in post—all essential parts of a modern 3D Workflow.
We even went further into Advanced Nuke Workflows, where you can integrate your 3D Art seamlessly with live-action footage. Whether you’re building cinematic shots or product visualizations, these techniques make your work truly stand out.
Finally, we finished with Look Development—because no project is complete without thoughtful Color Grading, balancing exposure, adding Visual Effects like glows and flares, and using LUTs to achieve that final, cinematic polish.
The benefits of mastering lighting and composition in Blender and Nuke can’t be overstated. It’s the difference between hobbyist work and professional, portfolio-ready art that wows clients and audiences alike.
At Whizzy Studios, we live and breathe these 3D Workflow techniques every day. And if you’re ready to take your work to the next level, you can always hire dedicated Artist to collaborate with you and bring your vision to life.
Most importantly, don’t be afraid to keep exploring and practicing. Every scene you light, every comp you build in Nuke, makes you a better artist. Mastery takes time—but it’s worth it.
So open Blender, fire up Nuke, and start experimenting. Your best work is still ahead of you.


Comments